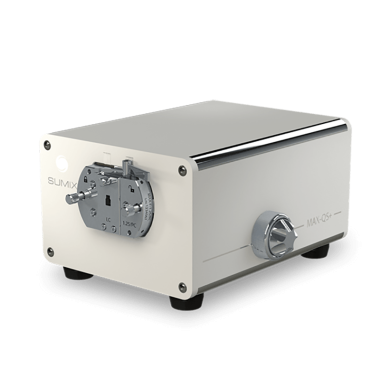
MAX-QM+ is an automated interferometer for inspection of single and multi-fibre connectors of MTP®/MPO, ST, FC, SC, LC, MU, E2000™, SMA types as well as MT, MT-RJ ferrules.
High measurement speed, portable design, autofocus and a large field of view with the ability to test 12 or 16 fibres per row have made MAX-QM+ an immensely popular solution for high-volume production lines.
MAX-QM+ is supplied with the industry-leading MaxInspect™ software for interferometric inspection of fiber optic connectors.
High resolution 2D and 3D surface profiles
Explore surface details as small as 2.2 μm.
Autofocus
Minimize operator’s actions to just one click.
Large field of view of up to 5700 μm
Measure connector from guide hole to guide hole.
Fast measurements
Measure multi-fibre connectors as quickly as 3 seconds.
Compatibility with innovative Side+Front View fixtures
Overcome cable tension and ferrule positioning uncertainties in MTP®/MPO measurement and control additional parameters - guide holes parallelism and angles.
MT16 and MT32 inspection
Stay on top of the latest market technologies.
Ergonomic fixture design
Save time with easy ferrule/connector insertion and fixture handling.
Data-base connectivity
Store measurement data from all local sites in one place and easily integrate Sumix equipment into your manufacturing systems.
Compliance to industry standards
Test per IEC, Telcordia or your own Pass/Fail criteria.
MAX-QM+ interferometric system includes:
- MAX-QM+ interferometer
- Optical flat standard for device verification
- USB 3.0 cable
- AC adapter
- Allen key
- Case
- MaxInspect™ software license
Fixtures and other accessories should be ordered separately.
| System | |
| Measurement technique: | non-contact; Michelson interferometry |
| Lens: | NA = 0.15; flatness error < λ/50 |
| Illuminator: | green LED (530 nm) |
| Field of view: | 5.6 × 4.2 mm |
| Lateral resolution: | 2.2 µm |
| Magnification: | 100× (the digital zoom turned off) |
| Focus: | auto and manual |
| Maximum image size: | 2590 × 1940 px |
| Best suitable for connectors/ferrules (PC and APC): | MTP®/MPO, MT, MT16/32, MT-RJ, SMA, SC, FC, ST, LC, MU, E2000™, MIL Spec termini |
| Microscopy Mode: | No |
| Measurement | |
| Measurement mode: | phase shift and white light |
|
Scanning and calculation time:
Measurement time may vary depending on computer performance and connector end face shape.
|
1 sec for single fiber, 3 sec for MT12, 6.9 sec for MT16, 4.9 sec for MT24, 5.7 sec for MT72. |
|
Measurement Range:
|
ROC (mm): 1 to flat Apex offset (μm): 0 to 2000 Fiber height* (μm): more than 1000** Angles measurements - full range (degrees): 0 to 28*** * Difference from the highest and lowest points of the scanned object. **<100 µm available by default. >100 µm - for special connectors/tasks (software adjustment required). *** Regular fixtures - 0, 8, 9 degrees. Customized fixtures - 0 -28 degrees. |
|
Repeatability C.F.*:
* Values were calculated from 30 consecutive measurements without interaction on connector between measurements (connector fixed) and represent one sigma value. |
ROC: 0.9 % (MT12); 0.04 % (SC/PC) Fiber Height: 0.8 nm (MT12); 0.1 nm (SC/PC) Angles: 0.005 deg (MT12); 0.0002 deg (SC/PC) Apex Offset: 0.04 µm (SC/PC) |
|
Repeatability C.R.*:
* Values were calculated from 30 consecutive measurements with removing and inserting connector between measurements (connector reloaded) and represent one sigma value. |
ROC: 1.2 % (MT12); 0.05 % (SC/PC) Fiber Height: 1.1 nm (MT12); 0.4 nm (SC/PC) Angles: 0.01 deg (MT12); 0.006 deg (SC/PC) Apex Offset: 1.1 µm (SC/PC) |
|
Recommended environment
|
|
|
Temperature:
|
+20°... +24°C |
|
Pressure:
|
700 – 850 mm mercury |
|
Humidity:
|
5 – 75%, non-condensing |
|
Dimensions & weight
|
|
|
Dimensions (H × W × L):
|
103 × 137 × 183 mm (4.06 × 5.39 × 7.2 inches) |
|
Weight:
|
3.8 kg (8.4 lbs)
|
|
Power
|
|
|
Power supply:
|
external, USB 3.0 cable, 12 V DC power adapter
|
|
System requirements
|
|
|
Recommended:
|
Windows 10
Intel Core i7 4GB RAM or higher Built-in Intel USB 3.0 controller Microsoft Excel 2010 or higher |


